
Right now EV's clothes live in hampers. We wash them, she wears them, we wash them, pretty simple. Yet this results in numerous hampers full of clothes. Newborns = laundry, laundry and more laundry (they seem to poop and spit up on EVERYTHING). I'm going to need those hampers. Enter, my childhood dresser.
This thing has been living in my parent's garage for a while now. As far back as I can remember, I always had this dresser...and you can tell. The hardware is ancient, the drawers are rickety and my name is even carved in the top (yep, got in trouble for that one). I'm all for recycling items so I thought this dresser was the perfect candidate.
I found inspiration in this post on Life as a Thrifter which is actually a link to this post on Twice Lovely.
Basically, Anne Marie took an old dresser and used fabric as the front. I really liked the idea of using fabric but the coral color and this particular fabric wasn't doing it for me. So, here is my attempt at her project:
First off, a committed a cardinal sin: I didn't take a before picture! Ugh, how could I forget?
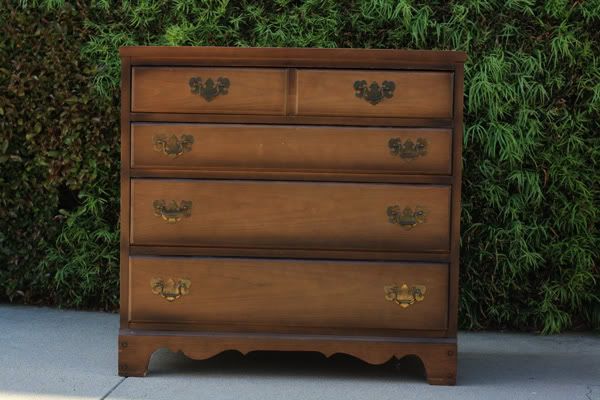
Just imagine a plain, old dresser. One in need of a sanding, badly. It has brass hardware (which I reused so you'll get to see those updated), is dark in color and overall, plain...and old.
It reminded me a little of this dresser I found here:
You can read how to do this project on Twice Lovely's blog but here are some things I learned:
I first headed off to Jo-Ann Fabrics even though there is fabric somewhere in this house which I could have used. We weren't able to find it and from what I can remember, it was too small of a print for what I was intending. I wanted something bolder, not as bold as the inspiration piece, but not far off.
When buying fabric for this project keep in mind what you will be using it for. I would not advise buying a knit fabric. It will stretch, absorb any sort of liquid adhesive or sealer and the color changes during the process. How do I know all this? I bought a knit fabric. I wound up getting 2 yards since I didn't know how much I actually needed and I wound up using a fair amount of that. It cost me $18.88 total. I could have gone 1.5 yards but I only knew that in hindsight.
Next stop, head to Lowe's for paint for the dresser. Dad suggested I purchase a semi-gloss exterior with paint + primer. I cut out a piece of the fabric for them to match and they did a pretty fair job. The woman let me know it was darker because it was fabric (apparently this is normal?) but I didn't mind. Luckily it was darker because my fabric got darker during the process. We also had to buy sand paper and a hand sander, not a nice electric do-the-hard-work-for-you kind, but instead Ed wanted just a regular old thing to hold in his hand to manually sand.
| elbow grease required |
Also needed sand paper and a sealant. We owned a nice synthetic brush (thanks, Dad!) so I didn't need to purchase one. I already owned Mod Podge and foam brushes so we were good there too.
Onto the project...
Now insert days of waiting since it finally rained in Bloomington! We could have done this project in the shed or downstairs but with me being preggers, decided to only do it outside so any fumes from the adhesive or polycrylic would be minimal.
Ok, few days are over...actually start:
After sanding, I applied a liberal coat of Mod Podge. I have never had complete success with this product but I decided to try again. I did do a test piece with fabric on some scrap plywood and the Mod Podge wound up beating out the spray adhesive. So, Mod Podge it was.

I just used a foam brush. I was messier and messier as I went. Looking back, make sure you don't have any really thick spots of Mod Podge, especially if using knit. It will soak it up and change the color more so than other spots. The fabric does change overall, you just want to be consistent.

 |
| I cut the fabric so I had extra on the sides, which was trimmed later. |
 |
| I really have no idea what I'm doing most of the time. |
Using a knit it did stretch a bit so I started from the middle and gently laid it onto the Mod Podge.
 |
| All stuck on there. I Mod Podged under the lip too so it would stay. The top drawer had some grooves in it. I just pressed the fabric down in those spots. |
After this I trimmed off the excess and we added 4 coats of Polycrylic:
I wanted to seal the fabric to make sure it didn't get dirty or stain. Preferably I would not feel the fabric at all. This is where the Polycrylic comes in. This stuff soaks into the fabric on the first coat, but eventually you get it thick enough to where the coats are now actually sealing the fabric. We used a nice synthetic brush and let it dry at least 2 hours between coats. After the 3rd and 4th coats Ed sanded it with 220 grit paper (what it suggests on the back).
We had covered the hardware holes so he put a few little nail holes and used a razor to cut them back out. I stopped at Menards to get some girly hardware for the top since those needed to be completely replaced.

We spray painted the original hardware a bright pink to go with the large flowers:
 |
| I think this is a cool picture. |

And, TA-DA! A completed project!!!


We already put it in EV's room but haven't filled it with clothes yet. Some of the corners of the fabric are thicker and I didn't trim them very well so the drawers aren't completely flush, yet I don't even think they were before. I'm not sure on the budget of the project considering we purchased the fabric, spray paint, dresser paint, sand paper, polycrylic and extra hardware. I doubt I could actually buy this dresser for our total price and Ed and I really enjoyed doing this project together.
When EV saw it she opened up every door and gave us a lecture on which items will go in which drawer...or at least I think that's what she was telling us. She still speaks Icelandic so I have no idea what she says. There are lots of hand motions and facial expressions though. Tried to capture it on camera but of course, she stopped the second I hit record.
So, if I could do this project, so can you! If you ever feel like doing it and have a question (I had a million which I had to discover guess and check style), leave a comment and I'll let you know how we handled it.
For now, it feels great to check a project off the list! Next up, art desk for EV by recycling my 12 year old IKEA desk (this stuff isn't made to last more than 5 years I swear) and the cubby hole book shelf. Oh, and birthing a baby!
Becky, that dresser turned out wonderfully! You and Ed did a great job. Can't wait to see your other creations!
ReplyDeleteOh and birthing a baby. Can't wait to hear about that one...oh and more projects. Hehe! Excellent work. We were going to repaint a dresser in our bedroom, and my creativity failed, I took it home with a can of paint for my dad to sand/repair/paint for us :-) I cheated.
ReplyDeleteOh my word - love it!!! Turned out sooo cute - geez, I got to try some of these things. And no matter what you say, you have a lovely and obvious baby bump :)
ReplyDeleteI like how Ed wanted a hand sander. The way I get Marty on board with my craft/remodelling projects is by pointing out how he'll probably have to (read "get to") buy some new tools in order to complete it. Filling out his power tool collection is his main motivation for agreeing to help me with these things.
ReplyDeleteWow! That looks great!
ReplyDeleteTurned out so great! Glad you were inspired! :)
ReplyDelete